Amazing. I chilled and opened bottle 1 of the Flat Wan Ale. I poured a pint glass. It had a head! It had a steady upflow of tiny bubbles! It was perfectly carbonated. The flavor is, frankly, not an abomination before the beer gods. Not complex, not particularly interesting, no bitterness to speak of (given the tiny boiling hops oversight), but with mild malty and hoppy flavors and a faintly sweet, fruity finish. If I ordered it in a pub I would not be enraged. If I hadn't followed Joe's suggestion of desperation dry hopping I'm sure it would be worthless.
Gravity is about 1.018. If a pound of LME per gallon yields an original gravity of between 1.034 and 1.038 then the ABV is somewhere around 2.5 percent. That feels about right; there isn't much kick to the stuff.
Two hours after opening the two liter bottle there's still plenty of carbonation. This would be a serviceable bottle size for any sort of social occasion.
Update: Opened bottle 2 on 1/1. I think the results of the experiment are clear. Pints from this bottle had a better and much longer lasting head. Both shaken and unshaken carbonated adequately, but the shaken bottle is the definite winner. I suspect that it was probably ready before the unshaken bottle.
Tuesday, December 30, 2008
Thursday, December 25, 2008
Christmas dinner
 It was just the four of us for Christmas dinner so I didn't go all out, but with very little effort we had something simple and quite nice: leg of lamb, roasted red potatoes, and bell pepper salad with feta cheese.
I let the boneless lamb come up to room temperature for an hour or two, then rubbed it inside and out with olive oil and a generous quantity of cracked black pepper and kosher salt. Rolled it back up with a few sprigs of fresh rosemary inside. Roasted at 180 degrees until it reached 125, removed it and covered it with foil while the oven heated to 450, then popped it back back in for a few minutes until it reached 135. Covered it with foil again and it coasted to about 140.
While the lamb was resting, I coated the small red potatoes with olive oil, salt, pepper, and garlic. They went in at 400 for about 30 minutes with the convection fan on.


The whole meal took no more than 25 minutes of active work and everything was superb. This was the most patience I've ever exercised with a leg of lamb and it really paid off. It came out of the refrigerator at 8:00 and wasn't on the table until 2:00. Perfectly medium rare all the way through and loaded with juices. There was hardly a drop on the serving platter.

Wednesday, December 24, 2008
second brew (red ale), part 6

That gravity does seem a little high. If the fermentation is stuck it's not because of low temperature or temperature change; it has been steady at about 67 degrees. I guess the yeast could be weak or under-pitched, but it wasn't an especially high original gravity and it did fine for quite a while. I'm reluctant to add more yeast at this point, though I guess I could try that. Palmer identifies a third cause as using an extract with low attenuation. Not sure how I'd know if that's the issue, but if it is it's not really a problem, just a fact.
Assuming this is the final gravity and that my original gravity reading was accurate (that's a stretch) the ABV would be about 4%.

Tuesday, December 23, 2008
first sourdough bread attempt
 I deployed the sourdough starter for the second time today. Last night I followed the no-knead 1-2-3 method documented in this psychedelic YouTube video and baked this morning. I doubled the recipe, thinking that at least one loaf would be screwed up somehow.
It rose overnight in the oven with the light on. I was startled to see this morning that the temperature was close to 110 degrees! This produced a pretty thick skin on the dough. The target was closer to 80 degrees. It was in for about 14 hours. It did seem to have plenty of internal porosity.


The dough was very sticky and lacking much baking experience I really wrestled with getting it folded over and shaped decently. Dropping it into the dutch oven was a challenge, too.

Baked for 20 minutes covered and 18 uncovered. After baking it rested for maybe 20 minutes before I couldn't wait any longer and cut into it. The crust is just about perfect. The interior was disappointingly dense and a little underdone. Not terribly so, but it didn't have that glutinous stretchiness. The flavor was nice; it's definitely sourdough. The areas that skinned over during rising were visible inside.


The general method is to use 1 cup of starter, 1 cup of water, 2 teaspoons of salt, and 3 cups of flour. Mix and let rise 8 to 12 hours. Preheat oven to 500 for 20 minutes. Preheat dutch oven and lid for another 20 minutes. Bake for 20 minutes covered and 15 to 20 uncovered.
Things to try in future attempts:
- Correct rising temperature. Maybe this contributed to the density.
- Improve dough handling methods. The savagery of the man-dough tussle surely destroyed some bubbles. Lubricate the rising bowl. Don't try to divide the risen dough.
- Bake a little longer to ensure interior is done.
- A smaller Dutch oven might contribute to a higher, rounder loaf.
Monday, December 22, 2008
maple syrup snow candy

Since I happened to have on hand an astonishing surfeit of snow, a pretty good quantity of maple syrup, and two ravenous boys, it seemed like an obvious time to try it out.

It took a bit of experimentation. If the syrup doesn't boil long enough then it will be too thin. It needs to bubble and froth for several minutes.

If the snow is not packed tightly enough then the hot syrup will melt through the snow and you'll end up with something more like a maple syrup snowcone.

But if you have cold dense snow and thick syrup you can make something pretty nice!


I don't think this is exactly the consistency of the candy as I have read about it. It supposed to be soft and waxy and this is somewhat malleable but quit firm. It's a little more fun to make than eat, honestly, but we enjoyed it.

This post is linked on
sourdough pancakes
Last night as I was feeding the sourdough starter I was certain it was ready to go. I divided it and fed it heartily. This morning I made pancakes using the simplest recipe I could readily find. Many called for ingredients I didn't have on hand, like evaporated milk or buttermilk, or required partial prep the night before. This one doesn't seem like anything special, and the text is slightly insane, but the pancakes turned out well.
Ingredients:
2009-02-14 update: Another variation.
Mixed all liquids, sifted dry ingredients together and mixed, then mixed dry into wet. 325 is a good griddle setting. Used all-purpose flour and original amounts of baking powder and soda. These were tender and fluffy.
Ingredients:
Mixed all at once. Consistency seemed just right. Cooked on an oiled 350 degree griddle. Flavor and texture were very nice. They could be fluffier -- next time I'll investigate that. I used bread flour, since that's all I had. First things to try are probably to not use such a glutinous flour and to not overmix. More baking soda might help too.
- 1 cup starter
- 1 cup milk (2%)
- 2 eggs
- 1 cup flour
- 2 tablespoons sugar
- 1/2 teaspoon baking soda
- 1 teaspoon baking powder
- 1 teaspoon salt
- 1 tablespoon canola oil
2008-12-24 update: Tried again.
Changes: Used rounded measures of baking soda and baking powder. Beat eggs and milk together into a froth first, then mixed in non-flour dry ingredients. Mixed in flour. Added starter last, whisked lightly, and there were many visible bubbles. Experimented with larger and smaller pancakes.
Results: Definitely lighter. Slight baking powder/soda taste on occasion. Bigger is better as the pancakes are thicker. Overcooking tends to toughen them. They are at their thickest and fluffiest when they are large and a very pale gold.
2009-02-14 update: Another variation.
Mixed all liquids, sifted dry ingredients together and mixed, then mixed dry into wet. 325 is a good griddle setting. Used all-purpose flour and original amounts of baking powder and soda. These were tender and fluffy.
Saturday, December 20, 2008
second brew (red ale), part 5
Hmm. I just measured gravity at around 1.018. That's a significant uptick from the last reading several days ago, which I don't think is possible. I can think of two explanations: Measurement error, or uneven distribution of the water with which I topped off the carboy after transferring from the primary. I'll be taking all readings with the hydrometer in the measuring tube now, which should improve accuracy. And, since I topped off very gingerly it does make sense that the water would be concentrated at the top of the wort for some time, giving an artificially low gravity reading. So, this is probably a truer measure than the previous two.
Clarity was very good. Flavor was again improved. Nice balance of bitterness and hoppiness; faint sweetness. This is quite drinkable!
My procedure this time was to sanitize all equipment, extract and measure, pour off a bit for tasting, and then pour back into the carboy. I hope this isn't risky. I'm thinking about in the future using BetterBottle carboys with valves for all stages. No siphoning, and being able to take samples right from a spigot sounds good to me.
magnetic spice rack
I finally finished the implementation of my new spice storage system. The objectives were to free up some kitchen space, extend herb/spice lifespan through light and temperature control, improve accessibility, and look fairly nice. Here it is, inside a cupboard door.

This is my second try. The first attempt was a flop. The original idea was to glue strong magnets to the backs of outward-facing aluminum containers with clear glass lids. The magnets turned out to be less powerful than I expected, the epoxy did not work well at all, the lids were not nearly tight enough to reliably stay in place, and baking to cure the epoxy weakened the magnets.
Now I'm using different containers, different magnets, and am not (at this point) permanently affixing the magnets to the containers. One tradeoff is that I can't readily see into these jars when they are hanging up so some of the aesthetic charm is lost, but simply labeling them should be acceptable.
Steel sheets are from Home Depot. Sufficiently magnetic stainless steel containers with clear plastic lids and really nice silicone seals are from The Seattle Restaurant Store. Epoxy-coated rare earth magnets are from Applied Magnets.
Magnets placed in groups of four deliver very firm attachment. Even two will do but four makes me quite comfortable. I can pretty much slam the cupboard door closed without worrying about anything being dislodged. I probably won't store my liquid mercury or finely ground plutonium here, but the mass of any common spice poses no problem at all.

The whole thing is dynamically reconfigurable, just not quite as quickly as if the magnets were glued to the containers. On the other hand, the containers remain unblemished and can still be used in the rotating metal racks they came in. And it's always going to be easier to glue than to unglue, should the need arise. If the containers weren't sufficiently magnetic I'd just go ahead and glue the magnets and be just as happy.
Lessons learned from the first try:
- Neodymium magnets can be weakened or demagnetized by high temperatures.
- I would use JB Weld if I were to again glue magnets to metal.
- If the containers are going to be in a horizontal orientation then the lids need to screw on or have very tight friction fittings, or they will sooner or later pop loose and provoke foul kitchen language.
- The ineluctable fate of glass lids is to fall and shatter.

This post is linked on
Friday, December 19, 2008
coffee pot ale, part 3
As of Friday morning all of the hops have descended and there's just a slight bubbling at the surface. If there was much krausen it was all concealed by the volume of hop fragments.
The wine cork and tube device is not airtight. It works as long as there is very little backpressure. In the future it would be better to stick to rubber bungs made for this.
I suspect that this wort is not one that will support really good fermentation. Based on the very low extract efficiency and the significant quantity of refined sugar adjunct there may not be enough free amino nitrogen or other nutrients for healthy yeast to grow. I don't know whether the vigorous primary fermentation refutes this theory, or whether failure may not be evident until later. Too much refined sugar can prevent the yeast from secreting enzymes for maltose fermentation, so perhaps the fermentation will get stuck after consuming all the sucrose. I guess the evidence of that will be a high final gravity and some sweetness. Well, this whole experiment is not producing anything very beer-like, I'm sure. It's more like a slightly alcoholic malt soda or something.
Thursday, December 18, 2008
coffee pot ale, part 2
Howly cowly! Using a transparent primary fermenter is good fun! I was not at all prepared for the sight of the wort seething like this. It has been doing so for a few hours now. It's quite audible, too.
This YouTube video shows even wilder fermentation in a large carboy.
This YouTube video shows even wilder fermentation in a large carboy.
coffee pot ale, part 1
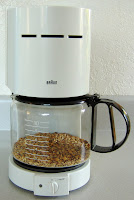
Tuesday afternoon I revisited my original brewing notion and made an attempt at following How to Brew Beer in a Coffee Pot.
Ingredients:

Other than using slightly more malt I followed the mashing and lautering instructions exactly. The coffee pot holds the temperature at just under 160 degrees. This is all the grain the filter basket can hold. Mashed-in for for an hour, sparged six times, plus poured the wort over the grain one last time into the kettle. This whole process takes about an hour and a half.

Total of 8 cups of wort. The flavor is grainy and pleasant but not particularly sweet. The color is deep and opaque. I should have measured the boil gravity at this point.

I was surprised to see that the grain has visible sprouts. These I now know are called acrospires. It's kind of fun to see them rehydrate. The spent grain is not nearly as tasty, with the preponderance of base malt, as the crystal malt I used in the red ale.

Started the boil and added two hop pellets. Added six more after 20 minutes. Closing in on 40 minutes the wort volume was getting awfully low so I added a couple of cups of water. Added three more hop pellets at 45 minutes. Off heat after 55.
I have no idea what the quantity of hops was by weight. I don't have scale and did not get a pellet count before using in the first batch so I can't make a good estimate.
Cooled the kettle quickly in ice bath. This quantity took only 10 minutes or so to reach 70 degrees. Added some water to fermenter and poured wort. Aerated vigorously. Pitched rehydrated yeast, probably nearly half a packet, and aerated again.

At this point I did take a gravity reading and was shocked to see it somewhere between 1.012 and 1.014. The volume is only about 6 cups even with the water I added, so the wort should be more concentrated than what I started with. This must mean that not nearly enough sugars were extracted from the malt. The flavor is not much different than the original wort. Not getting much from the hops, either. The color is about what I would expect.
Poured into a 2 liter bottle fitted with a homemade cork and blowoff tube arrangement (I love those rare occasions where there's some benefit to being a pack rat) but I think it's unfermentable wort. After two days there wasn't a single CO2 bubble as far as I know. Update: I now know the cork/tube arrangement was not airtight so it's possible there was some CO2 production that I did not see.


After some reading I concluded that I did not come even close to adequately cracking the grain. The instructions about avoiding a marble rolling pin and gently applying pressure led me to really underdo it, I think.
I had less than 1/2 cup of grain left, but cracked it pretty thoroughly and made another smaller pot of wort. I didn't bother with exact measurements, but this wort was probably at twice the concentration as the first one. The gravity was only 1.020. I supplemented with three tablespoons of cane sugar, boiled with a few more hop pellets, combined with the first wort, and now have a gravity of 1.028 or so. I think this may give the yeast something to do.
So I'm left to wonder what theoretical maximum gravity is possible with this method. This is a very rough estimate since I didn't weigh the malt, but: I bought about 1/2 pound, used 4/3 cups, had perhaps 1/3 cup left over, so used about 2/5 pound of malt to produce 8 cups of wort, or 4/5 pound per gallon. If this were all 2-row pale ale malt with a maximum yield of 38 PPG and a 70% efficiency, which I think would be pretty good for homebrew procedures, then the yield would be 38 x .7 x .8 = 21.28, for a gravity of 1.021. Working backwards from OG of 1.014 at 6 cups the boil gravity would have been 1.0105 at 8 cups. That's an extract efficiency of 10.5 / 38 / .8 = 35%. Given that a fourth of the malt was crystal with a PPG of 34 rather than 38 and making large allowances for estimation error I'm willing to believe that this result is actually not an enormous surprise. I think I will try it again with properly crushed grist and careful measuring and see what kind of extract efficiency I can get. It's an interesting experiment.
I really don't know what to expect from my 6+ cups of fortified weak sauce. If it doesn't show signs of fermentation in the next couple of days I'll probably just dump it. I am very interested in figuring out how to do these nanobatches experimentally, so I do want to see how this simple carboy works. Probably gallon glass jugs are a better size and material, though.
A good kitchen scale is definitely on the to-buy list, as it sort of has been for years.

Ingredients:
- 1 cup organic US two row base malt
- 1/3 cup English crystal 60L (or was it 40L?) malt
- Saaz hops, 2007, alpha 4.0
- Muntons active brewing yeast

Other than using slightly more malt I followed the mashing and lautering instructions exactly. The coffee pot holds the temperature at just under 160 degrees. This is all the grain the filter basket can hold. Mashed-in for for an hour, sparged six times, plus poured the wort over the grain one last time into the kettle. This whole process takes about an hour and a half.

Total of 8 cups of wort. The flavor is grainy and pleasant but not particularly sweet. The color is deep and opaque. I should have measured the boil gravity at this point.

I was surprised to see that the grain has visible sprouts. These I now know are called acrospires. It's kind of fun to see them rehydrate. The spent grain is not nearly as tasty, with the preponderance of base malt, as the crystal malt I used in the red ale.

Started the boil and added two hop pellets. Added six more after 20 minutes. Closing in on 40 minutes the wort volume was getting awfully low so I added a couple of cups of water. Added three more hop pellets at 45 minutes. Off heat after 55.
I have no idea what the quantity of hops was by weight. I don't have scale and did not get a pellet count before using in the first batch so I can't make a good estimate.
Cooled the kettle quickly in ice bath. This quantity took only 10 minutes or so to reach 70 degrees. Added some water to fermenter and poured wort. Aerated vigorously. Pitched rehydrated yeast, probably nearly half a packet, and aerated again.

At this point I did take a gravity reading and was shocked to see it somewhere between 1.012 and 1.014. The volume is only about 6 cups even with the water I added, so the wort should be more concentrated than what I started with. This must mean that not nearly enough sugars were extracted from the malt. The flavor is not much different than the original wort. Not getting much from the hops, either. The color is about what I would expect.
Poured into a 2 liter bottle fitted with a homemade cork and blowoff tube arrangement (I love those rare occasions where there's some benefit to being a pack rat) but I think it's unfermentable wort. After two days there wasn't a single CO2 bubble as far as I know. Update: I now know the cork/tube arrangement was not airtight so it's possible there was some CO2 production that I did not see.


After some reading I concluded that I did not come even close to adequately cracking the grain. The instructions about avoiding a marble rolling pin and gently applying pressure led me to really underdo it, I think.
I had less than 1/2 cup of grain left, but cracked it pretty thoroughly and made another smaller pot of wort. I didn't bother with exact measurements, but this wort was probably at twice the concentration as the first one. The gravity was only 1.020. I supplemented with three tablespoons of cane sugar, boiled with a few more hop pellets, combined with the first wort, and now have a gravity of 1.028 or so. I think this may give the yeast something to do.
So I'm left to wonder what theoretical maximum gravity is possible with this method. This is a very rough estimate since I didn't weigh the malt, but: I bought about 1/2 pound, used 4/3 cups, had perhaps 1/3 cup left over, so used about 2/5 pound of malt to produce 8 cups of wort, or 4/5 pound per gallon. If this were all 2-row pale ale malt with a maximum yield of 38 PPG and a 70% efficiency, which I think would be pretty good for homebrew procedures, then the yield would be 38 x .7 x .8 = 21.28, for a gravity of 1.021. Working backwards from OG of 1.014 at 6 cups the boil gravity would have been 1.0105 at 8 cups. That's an extract efficiency of 10.5 / 38 / .8 = 35%. Given that a fourth of the malt was crystal with a PPG of 34 rather than 38 and making large allowances for estimation error I'm willing to believe that this result is actually not an enormous surprise. I think I will try it again with properly crushed grist and careful measuring and see what kind of extract efficiency I can get. It's an interesting experiment.
I really don't know what to expect from my 6+ cups of fortified weak sauce. If it doesn't show signs of fermentation in the next couple of days I'll probably just dump it. I am very interested in figuring out how to do these nanobatches experimentally, so I do want to see how this simple carboy works. Probably gallon glass jugs are a better size and material, though.
A good kitchen scale is definitely on the to-buy list, as it sort of has been for years.
Tuesday, December 16, 2008
second brew (red ale), part 4
I needed to lower the level in the carboy so I picked up a wine thief and a measuring tube. Gravity is at about 1.014 or 1.015. The measuring tube is nice, but it takes an awful lot to float the hydrometer. Even one more extraction and the level in the carboy will be too low. I'm not sure I should keep replacing the lost beer with water. Perhaps I should measure directly in the carboy with a sanitized hydrometer? That seems less risky than relying on a sanitized wine thief, measuring tube, and hydrometer then pouring the beer back.
I'd say that the flavor has improved somewhat. Tracey liked it. What I perceived as a metallic tang the other day is not so evident. The overall flavor is more complex but still pretty simple, which I suppose is to be expected. I'm pleased with the way it's going.
I'd say that the flavor has improved somewhat. Tracey liked it. What I perceived as a metallic tang the other day is not so evident. The overall flavor is more complex but still pretty simple, which I suppose is to be expected. I'm pleased with the way it's going.
Monday, December 15, 2008
ribeye roast with potatoes and brussels sprouts
This was a suspiciously inexpensive ribeye roast, and it did live down to my expectations. I roasted it in a hurry, too, instead of using my preferred method of very low and slow before a fast blast, so didn't get very even temperatures. The lip was way overdone. It was acceptable at best.

However, the red potatoes and brussels sprouts roasted with a bit of onion and garlic were excellent. This is the first time I've roasted the little green brains. I oven-blast broccoli and cauliflower with olive oil and garlic pretty regularly. Brussels sprouts work even better (beef roast drippings surely help).

How Christmasy!

sourdough starter
I've toyed for years with the idea of having a sourdough starter for a pet. Not being a devoted baker I never followed through, but I now have one, acquired from Northwest Sourdough and rehydrated on 12/12. This variety is called the Northwest starter; I also bought the San Francisco starter but will wait on that one until I see how this goes.
Before its first feeding on 12/13 there was no noticeable activity other than a couple of small bubbles. Here it is on 12/14 before its second feeding:


I did not expect that kind of activity so soon! It had nearly doubled in size, too. I'm going to be pretty alarmed the day it calls me Seymour. It doesn't really have a sour aroma at this point.
After I have a little experience with this I think I'll start one or more from scratch so I can make some flavor and behavior comparisons. A guy named Mike Avery has a sourdough site with a Sourdough Starter Primer that has a ton of good information. His How Many Starters Do You Need, Anyway? makes it clear that the starters you catch can have very different traits. The Sourdough Myths page is also helpful.
Getting started with brewing and sourdough has afforded good opportunities to explain the behavior of yeast to the boys. They find it pretty fascinating. Well, I guess I do too.
Sunday, December 14, 2008
roasted chestnuts
 I attempted to roast chestnuts this evening. After a bit of reading I cut an X into the flattest face of each, sprinkled with water, and roasted in the oven at 400 degrees for about 25 minutes. The shells were fairly easily removed, but the interior skin was in almost all cases uncooperative. If I did this again I'd want to figure out how to solve that problem. More bothersome was the fact that many were spoiled. I remember this being the case the one other time I bought chestnuts. I do enjoy the flavor, and would like to try a recipe I have for roasted chestnuts and brussels sprouts.
This page has good information that I wish I'd seen before both buying and roasting: http://www.badgersett.com/info/chestnuts/instructions2.html. I think I'd order from them before buying from the grocery store again.
first brew, part 6
This afternoon I had a glass of what I am now calling Flat Wan Ale. This was from the bottle I tasted a week ago. There may be slightly more carbonation now, but it's nowhere close to where I'd like it. (Tracey sampled it last week, too. She said, "No offense, but it tastes like warm flat beer." Far from being wounded, I was happy that she successfully identified the room-temperature uncarbonated liquid as vaguely beer-like!) It is fairly hoppy and today I thought it had some bitterness too, which surprised me. But it remains dull and has very little body.
I do know that at least some CO2 is still being produced because the partial bottle had again developed a little pressure. It may still be premature, but I think I'm going to take this opportunity to do an experiment since I have two identical two-liter bottles remaining. I am going to give one a good shake to redistributed the yeast, and leave the other alone. I'll keep them at room temperature until, say, the end of the year. This ale is a major clunker, as expected, but at least it affords an opportunity to test this technique.
OK, bottle #1 is unperturbed and bottle #2 has been shaken. Much of the settled yeast is back in suspension. It foamed when shaken, but I don't have a good sense of how to relate that to degree of carbonation. When I checked an hour later the foam was gone and the bottle had not exploded, for which I was grateful.
espresso monkey roasting notes
 12/13/2008 roasted Sweet Maria's Espresso Monkey blend.
Roasted well over a pound to somewhere between a French and Italian roast using the stovetop popper on a gas burner. This is quite a bit darker than what I think is optimal for this blend. Next time try something lighter.
Outdoor temperature was 46 degrees, no wind. Starting temperature was 550, but I added the beans just as it was reached. Should have let it stabilize first. Low temp was just over 300. Struggled with temperature a bit. I think gas pressure is low, and I was roasting more beans than usual.
First cracklings audible at 2:15. Solidly into first crack at at 5:26. Peak at 6:23. Into second crack at 7:08. Off heat at 7:38. Did not record final temperature, but I think it was approximately 400. Now that I'm keeping track of and thinking about the numbers I realize that my indicated temperature is well below what the internal temperature of the beans must be. I don't think the probe reaches the beans for the quantities I'm roasting, for one thing.
I'm going to experiment with graphing this stuff. Here's one approach:
Air/mist cooled in colander. This is a lot of beans for that method. Chaff removal is harder with this quantity, too.
12/14 pulled double shots. Nice chocolate aroma when ground. Very smooth as a straight shot, but I suspect that when roasted this dark it has lost most of the interesting characteristics. The roast styles chart in Davids shows all varietal distinction being gone, for example. I enjoyed it more in a latte.

Saturday, December 13, 2008
second brew (red ale), part 3
 As of Saturday morning the specific gravity is 1.016 measured at about 67 degrees. Adjusted is 1.017.
Tasted. Not bad. Pronounced bitterness and hoppiness. I wonder whether I detect a hint of metallic flavor. I tasted from a sample extracted from the primary fermenter's spigot, which perhaps gave me a little sediment.
Palmer identifies two causes of metallic off-flavors as unprotected metals dissolving into the wort and hydrolysis of lipids in poorly stored malts. I doubt the former, although it is true that this was the first use of the big All-Clad pot. Perhaps I did not wash it adequately? The LME was from The Cellar's big drum. I'd be surprised if there was a general quality problem with their storage; surely this would be a big problem for the many brewers who must make use of it. It's also possible that is not at all what I am tasting. Something to pay attention to.
Decided to rack to the carboy for secondary fermentation. Learned that cleaning and sanitizing will be much easier with a second bucket. The wire sticking out of the carboy is my retrieval hook for the tube soaking inside the cleaner-filled carboy. Filling the carboy was a piece of cake with the spigot. I guess I'll have a chance to master siphoning when refilling the bottling bucket from the carboy.
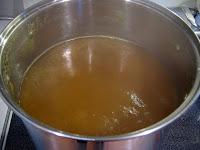
 I will be very interested to see the process of clarification. There's no noticeable particulate matter swimming around, but the level of opacity is pretty high.
 I resisted my urge to taste everything and did not sample the trub.

Friday, December 12, 2008
second brew (red ale), part 2
Airlock was bubbling pretty good after 12 hours. It was much slower after 8 more (in the morning) but still working. There appeared to be at 1 inch layer of krausen, though it's a little hard to tell through the side of the bucket. After another 12 it was still blowing, but it appeared that the krausen was pretty much gone. The temperature appeared to be several degrees greater than ambient, at 74 or so.
Here's a bit of video of the airlock. I think I needed more fluid (I was using sanitizer).
After 72 hours I'm no longer seeing anything happen in the airlock.
Here's a bit of video of the airlock. I think I needed more fluid (I was using sanitizer).
After 72 hours I'm no longer seeing anything happen in the airlock.
Wednesday, December 10, 2008
moka kadir roasting notes
12/7/08 roasted Sweet Maria's Moka Kadir blend. It is a blend of dry-processed Yemeni, Sidamo, and Ghimbi coffees. Checked it for rocks and dirt as recommended and found none, although there were a few broken beans.
Roasted about a pound to an espresso roast using the stovetop popper on a gas burner. First crack continues for a long time, with some beans well into second crack while others are at first. This is a known characteristic. The roasting smoke is not highly aromatic or dense, comparatively. Water and air cooled in a colander fairly quickly. Outdoor temperature was 50 degrees, no wind. Starting temperature was 550. Low temperature was about 340. Did not time.
Pulled two double shots immediately. Thick, dark crema. Very bold, but without many of the expected aromatics. Resting this blend for 2 or 3 days is recommended.
12/8/08 pulled double shots. It really claws its way across the palate and down the throat.
12/9/08 pulled double shots. Has mellowed a bit, but still is pretty aggressively mouth-filling and pungent.
12/10/08 pulled double shots; it has now been three days. Mellower still and more drinkable. Tried straight and in a cappuccino (1%). This is probably my least favorite of the Sweet Marias blends I've had in any quantity.
Other notes:
- Try brewing some instead. This blend wasn't designed for espresso only.
- Might also try a slightly lighter roast next time to see whether some of the expected characteristics are more evident.
Tuesday, December 9, 2008
second brew (red ale), part 1
This morning I brewed my second batch, with things mostly being more correcter than the first time. This was a five gallon batch of The Cellar's red ale recipe.
Ingredients:

I ended up following an amalgam of The Cellar's general instructions for their mini-brewery kit, The Cellar's instructions for the red ale recipe, and John Palmer's How To Brew instructions.
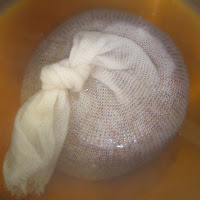
Steeped grains in muslin bag in 2 quarts boiling water (off heat) for 15 min. Delicious grain aroma!


Rehydrated the yeast in boiled 80-ish degree water in a sanitized glass jar. Swirled to mix after about 15 minutes, shook vigorously just before pitching.
Wort was down to 100 after 30 minutes in the sink. Added two gallons of cold tap water in fermenter and poured wort, bringing temperature down to 80. Poured back and forth between fermenter and kettle several times. Pitched yeast. Poured again. Topped off to 1 inch over 5 gallon mark.
Original specific gravity measured at 1.048 at 67 degrees. Adjusted for the hydrometer's 60 degree calibration that's about 1.049.
Tasted the wort and detected noticeable bitterness and slight hoppiness. It is lightly sweet. This is much more like I think it should be, compared to the first unhopped attempt. Quite a bit of crud in suspension. Next time might want to use some technique to minimize, but I think this will have settled by the time primary fermentation is complete and I transfer to the carboy.
Possible grievous errors:

Ingredients:
- 6 pounds pale LME
- 0.5 pounds English crystal 40L malt specialty grains
- 1.5 oz Palisade hops (boiling)
- 0.5 oz Palisade hops (finishing)
- 6 grams Muntons active brewing yeast (1 packet)

I ended up following an amalgam of The Cellar's general instructions for their mini-brewery kit, The Cellar's instructions for the red ale recipe, and John Palmer's How To Brew instructions.
Steeped grains in muslin bag in 2 quarts boiling water (off heat) for 15 min. Delicious grain aroma!


Brought 2.5 gallons of water to boil in 16 quart pot, which I initially thought was a 20 quart pot. Added steeping liquid and rinsed grain with another quart of hot water. Began stirring in LME and it foamed dramatically. Figured I was going to have boilover problems for sure, so removed 3 quarts to second pot. Distributed LME between the two and did some blending to get a fairly homogenous mix.

Boiled moderately for 55 minutes with bittering hops, then 5 with finishing hops. Not sure whether hot break had occurred before I was done mixing the LME and added the bittering hops. It certainly had occurred very shortly after.


I was going to use the wort chiller I borrowed from Joe, but it is too big for the 16 quart pot.
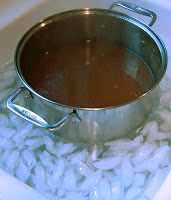
Cooled in ice bath. Much evaporation during boiling -- probably down from 3.25 gallons to well under 3. Starting a good whirlpool makes an enormous difference in heat transfer, with the ice responding rapidly.
Cooled in ice bath. Much evaporation during boiling -- probably down from 3.25 gallons to well under 3. Starting a good whirlpool makes an enormous difference in heat transfer, with the ice responding rapidly.


Rehydrated the yeast in boiled 80-ish degree water in a sanitized glass jar. Swirled to mix after about 15 minutes, shook vigorously just before pitching.
Wort was down to 100 after 30 minutes in the sink. Added two gallons of cold tap water in fermenter and poured wort, bringing temperature down to 80. Poured back and forth between fermenter and kettle several times. Pitched yeast. Poured again. Topped off to 1 inch over 5 gallon mark.
Original specific gravity measured at 1.048 at 67 degrees. Adjusted for the hydrometer's 60 degree calibration that's about 1.049.
Tasted the wort and detected noticeable bitterness and slight hoppiness. It is lightly sweet. This is much more like I think it should be, compared to the first unhopped attempt. Quite a bit of crud in suspension. Next time might want to use some technique to minimize, but I think this will have settled by the time primary fermentation is complete and I transfer to the carboy.
Possible grievous errors:
- May have aerated the wort while it was hot by pouring it from the small pot into the big pot and then by stirring it twice while it was cooling. See Palmer pp 71 - 72 for why this was bad.
- May not have allowed sanitizer to work long enough on thermometers used for yeast and wort.
- Dropped the small thermometer into the fermenter entirely, then had to fish it out with a probably inadequately-sanitized pair of tongs. I had sanitized only the probe, not the gauge, and since I normally use it when steaming milk for espresso drinks I was worried about milk-related bacteria.
- The two pot method worked OK, but it would be better to have a larger one. Bummer; I thought I had finally found a use for the 16 quart All-Clad!
- Pay attention to the orientation of the lid on the fermenter so that the airlock does not interfere with the bucket handle.
- Use more suitable thermometers. Candy thermometer doesn't go below 100, and the steamed milk thermometer is too short to be convenient. Plus, I tend to drop it. A floating thermometer might be perfect for the wort.
- Try the wort chiller next time to see if building one is worthwhile. The ice water in the sink isn't a terrible hassle but the freezer doesn't make enough ice for this. Would need to get some bagged ice in advance.
- I'm seeing conflicting information on whether it's good to use the straight tap water. Might want to boil and chill it in advance next time.
- Used Five Star cleaner and sanitizer.
- 2.5 gallons of water takes about 25 minutes to bring to boil on high heat.
- The boilover risk seemed momentary. When the hops are added it goes nuts! After stirring it dies down quickly and isn't a problem once boiling steadily.
- The spent grain is very tasty! I ate a few spoons full. It's contains the hulls, which I will no doubt discover are indigestible, but they are soft enough to chew.

Subscribe to:
Posts (Atom)