Showing posts with label food. Show all posts
Showing posts with label food. Show all posts
Sunday, October 10, 2010
Monday, October 4, 2010
baked Scotch eggs
I had Scotch eggs once, years ago, probably at a restaurant in Victoria. Unlike the fine people of Scotland I don't regard deep frying to be the apotheosis of cooking methods, but a breaded, sausage-wrapped hard-cooked egg hurled into boiling oil is indeed heart-stoppingly delicious.
Deep frying really doesn't seem necessary, though. I thought I'd attempt to make them in the oven.
I like baking eggs rather than boiling them. 30 minutes at 325 degrees is just right. The yolks become exceptionally creamy and it's much easier to hard-cook a dozen or two eggs this way than it is to boil or steam them.
I used a mild Italian bulk sausage mixed with a handful of minced onion and chives. I patted a couple ounces of sausage into a thin oval, dredged a wet egg in flour, and packed the meat around the egg. After being bathed in raw egg beaten with Dijon mustard, the egg was rolled in panko bread crumbs.

They rested on a cookie sheet in the refrigerator for a couple of hours, then went into a cold oven set to 350 degrees. After about 35 minutes I turned on the broiler for a few minutes to brown the bread crumbs.
The only problem was that the sausage split on most of them. I really didn't use a thick enough coating. I'd purchased only a pound of sausage and that just wasn't enough for eight eggs. Three ounces per egg would probably do the trick.

Despite this aesthetic glitch, the boys and I were quite pleased. The breading was crisp and not at all greasy, and the flavors and texture were just what I was looking for. And baking is so much more convenient than deep frying. I think I'll be trying this again.
Friday, October 1, 2010
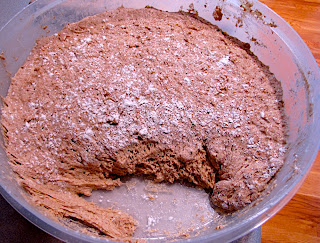
Brother Juniper's wild rice and onion bread
I just got the updated edition of Peter Reinhart's Brother Juniper's Bread Book: Slow Rise as Method and Metaphor. I've only skimmed it, liking very much what I've seen, but I did take a stab at the recipe for wild rice and onion bread.
Rather than wild rice I used leftover red jasmine rice, and I also chose the fresh onion variation rather than dried. Executive summary: fantastic!

It's slightly sweet, nicely oniony, very tender, and when freshly baked had a superb crackly crust.

Ingredients:
All the dry ingredients are mixed and then liquids added. I kneaded it in the KitchenAid for about 8 minutes. With this much yeast and sugar it rises aggressively. The first rise was an hour. I formed two loaves and let them rise for another hour. Baking time at 350 degrees was close to an hour. Because the dough contains brown sugar and buttermilk it's important to bake at a lower temperature or the crust will scorch.
Rather than wild rice I used leftover red jasmine rice, and I also chose the fresh onion variation rather than dried. Executive summary: fantastic!

It's slightly sweet, nicely oniony, very tender, and when freshly baked had a superb crackly crust.

Ingredients:
- 4 cups bread flour
- 4 cups AP flour
- 1 cup diced onion
- 1/3 cup brown sugar
- 2.5 tablespoons active dry yeast proofed in 4 tablespoons water
- 1.5 tablespoons salt
- 1 cup cooked red jasmine rice
- 1/3 cup buttermilk
- 1.5 cups water
All the dry ingredients are mixed and then liquids added. I kneaded it in the KitchenAid for about 8 minutes. With this much yeast and sugar it rises aggressively. The first rise was an hour. I formed two loaves and let them rise for another hour. Baking time at 350 degrees was close to an hour. Because the dough contains brown sugar and buttermilk it's important to bake at a lower temperature or the crust will scorch.
This is a good way to use leftover rice. I'd like to try it with a wild rice blend to see how it differs, but the red jasmine rice is also very flavorful, nutty, and firm. I wonder how the recipe would take to a doubling of the rice.
Wednesday, September 22, 2010
purple gusto pepper pico de gallo
Although the gardening has been wretched this year there are now a few usable purple gusto peppers among all the lovely blossoms on the plants I grew from Territorial seed. Since I'm now also harvesting a reasonable number of tomatoes it seemed like Salsa Night!

I've had one plant in the greenhouse and one outside. The peppers in the greenhouse are slightly but consistently larger.
They are fairly zippy. The flesh is thin and firm and I minced it very finely; any sizable piece would be fiery enough to incur significant displeasure in some of the household salsa eaters. Three of them went into a basic pico de gallo: peppers, tomatoes, onion, cilantro, lime, salt, and pepper.

It's very good, but I'd like it better with heftier chunks of pepper. Something meatier like a jalapeño would be preferable. But it's sure nice to be eating something new from the garden.
Monday, September 20, 2010
second biltong
It's been nearly a year since the first satisfying biltong venture, and while I still have a bit in the freezer it feels like time to try again. I did receive a slight prodding from the sight of the disassembled components of my homemade drying rig during a recent garage cleanup operation.
Biltong does freeze quite well, although my wrapping wasn't ideal and I can detect a bit of freezer flavor. We last enjoyed it during World Cup while watching one of South Africa's games. Our respectful gesture did not seem to help them any.

The interior of the first biltong is still pretty pink. It oxidizes in a matter of seconds after being sliced. I think this is probably on the rare side for biltong but there doesn't seem to be any problem with it spoiling in this state.
This time I thought I'd try flank steak. QFC had it on sale so I picked up a little under nine pounds at $5/pound. I used something pretty close to the same recipe, doubling it and also adding a teaspoon of red pepper flakes. I did not double the salt, however, sticking with two tablespoons.

The steaks were sliced in half with the grain, yielding eight long slabs. These should all fit in the dryer just fine despite the doubling of quantity.

It went into ziplock bags. I later noticed that the marinade dregs included perhaps a teaspoon of salt, so this recipe is using considerably less than the last. It is very tasty and I should come up with some other use for it.

After marinating for more than 24 hours they went into the Meat Wardrobe on Monday evening. I ran it it a little cooler than last time, probably averaging less than 100 degrees. Since the fan runs only when the heating element is on there's less air flow as well.

Friday evening I took a sample. It was still quite rare inside.

The flavor was good and I liked the texture at that point, although it will certainly become a little less pliant after a few more days. The sheen on the sliced surfaces is fat, not water. It's not nearly as moist as it looks.

Saturday morning I pulled one out to take to Matt's pig roast, wrapped it, and forgot it. The rest came out Monday morning, for a total of 6.5 days in the dryer. The final weight was 63 ounces.

I'm very pleased with it. It strikes me as more flavorful than the first one. There's no detectable heat from the red pepper flakes, so next time I might crank that up. It certainly doesn't need more salt for flavor. I wonder to what extent the salinity affects the transfer of marinade flavors into the meat, though. Too little salt may be detrimental in that regard.

So, good result. If I didn't keep poking at it and taking pictures it would be an entirely hands-free operation between hanging and harvesting, so probably only about an hour of active time is required. It works out to a little more than $11/pound, while I see it advertised for more like $25 - $40/pound. It's much tastier than any beef jerky I've ever had. Definitely a worthy undertaking
Biltong does freeze quite well, although my wrapping wasn't ideal and I can detect a bit of freezer flavor. We last enjoyed it during World Cup while watching one of South Africa's games. Our respectful gesture did not seem to help them any.

The interior of the first biltong is still pretty pink. It oxidizes in a matter of seconds after being sliced. I think this is probably on the rare side for biltong but there doesn't seem to be any problem with it spoiling in this state.
This time I thought I'd try flank steak. QFC had it on sale so I picked up a little under nine pounds at $5/pound. I used something pretty close to the same recipe, doubling it and also adding a teaspoon of red pepper flakes. I did not double the salt, however, sticking with two tablespoons.

The steaks were sliced in half with the grain, yielding eight long slabs. These should all fit in the dryer just fine despite the doubling of quantity.

It went into ziplock bags. I later noticed that the marinade dregs included perhaps a teaspoon of salt, so this recipe is using considerably less than the last. It is very tasty and I should come up with some other use for it.

After marinating for more than 24 hours they went into the Meat Wardrobe on Monday evening. I ran it it a little cooler than last time, probably averaging less than 100 degrees. Since the fan runs only when the heating element is on there's less air flow as well.

Friday evening I took a sample. It was still quite rare inside.

The flavor was good and I liked the texture at that point, although it will certainly become a little less pliant after a few more days. The sheen on the sliced surfaces is fat, not water. It's not nearly as moist as it looks.

Saturday morning I pulled one out to take to Matt's pig roast, wrapped it, and forgot it. The rest came out Monday morning, for a total of 6.5 days in the dryer. The final weight was 63 ounces.

I'm very pleased with it. It strikes me as more flavorful than the first one. There's no detectable heat from the red pepper flakes, so next time I might crank that up. It certainly doesn't need more salt for flavor. I wonder to what extent the salinity affects the transfer of marinade flavors into the meat, though. Too little salt may be detrimental in that regard.

I think the slices at an angle across the grain of the flank steak produce a better texture than either the tri-tip or sirloin.
So, good result. If I didn't keep poking at it and taking pictures it would be an entirely hands-free operation between hanging and harvesting, so probably only about an hour of active time is required. It works out to a little more than $11/pound, while I see it advertised for more like $25 - $40/pound. It's much tastier than any beef jerky I've ever had. Definitely a worthy undertaking
Monday, September 13, 2010
homemade biltong dryer AKA the meat wardrobe
Biltong is a cured, air-dried meat. Some people dry it outdoors for a little extra tree and insect flavor, some hang it in a closet for a hint of cedar and lint, and some use a low oven and live without baked potatoes for a whole week. An artificial heat source is optional, although temperature and humidity obviously have a large effect on the drying time.
For my first attempt last year I wanted a somewhat controlled and sanitary environment for drying the biltong, as well as one that wouldn't conflict with other household activities. I ruled out the garage, oven, and my sock drawer and figured I'd build something.
My thoughts quickly turned to the wardrobe moving boxes we purchased several years ago. They were so expensive that I just couldn't bear to throw them out. They have over 10 cubic feet of volume, a shirt and meat hanging rod, several cutouts for carrying and venting, and a convenient access panel. I also had a small thermostatically controlled forced air heater with a safety shutoff. Perfect!

I cut a piece of scrap plexiglas, probably left over from the construction of some reptile enclosure, for a viewing window.

This spare oven thermometer goes down to 100 degrees F, which seems fine for the low end. The heater, pretty close to its lowest power and thermostat settings, holds the temperature just fine at 100 to 120 degrees.

I lined the bottom of the box with aluminum foil for sanitation. At least initially the meat does drip a bit. Here's my five pound first batch hanging.

And here it is all done.

One reasonable modification would be to raise the height of the bar. There's plenty of room to go up with it, and very long cuts of meat might hang low enough to be undesirably close to the heater.
Overall it ends up being a convenient and multitasking tool. The box breaks down for flat storage, and the heater keeps the garage smelling meaty fresh when I'm out there in cold weather.
Saturday, September 11, 2010
testing the $3 popover pan
While dropping of some stuff at a thrift store I made my usual book and electronics scavenging run and found a nearly mint condition "professional quality" black steel popover pan in the original box for $3! (I was looking at more than books and bits, obviously.) The heavy black steel is supposed to lower the baking temperature by 25 degrees and decrease the baking time by 10% or more.

For starters I tried the recipe on the front of the box. At the time I didn't have any all-purpose flour so I figured I'd experiment with what I had: whole wheat pastry flour and white whole wheat flour. I also added the "speck of soda" penned in by the previous owner. I wasn't surprised when this didn't produce the ideal result. Probably any significant proportion of whole wheat with its jagged shards of bran is going to prevent the batter from capturing the steam that makes the popover pop. They did puff to a degree, but the interior was fairly solid. Still, they were light and tasty, like a whole wheat German pancake.
After restocking the cupboard with unbleached AP flour I tried again, omitting the soda speck. Now that I think about it, the author of that modification surely meant baking powder, not soda. Perfect results this time.

Alton Brown's popover recipe in I'm Just Here For More Food is a little different, adding some butter, using some water and less milk, and using one less egg. I'll have to try that next.
Monday, August 16, 2010
Naturally Preferred Organic Whole Wheat Rotini one word review: yech
In a few more words it's flavorless, roughly textured, and has no elasticity (and not as a result of overcooking). It may be a step up from the cardboard box it comes in, but only because that little plastic window would get stuck in your throat.
This is a Kroger house brand. I won't buy the stuff again.
This is a Kroger house brand. I won't buy the stuff again.
Sunday, August 15, 2010
homemade ciabatta bruschetta with tomato salad
Leafing through the Sunday paper I saw a recipe for tomato salad on grilled bruschetta. (I think "grilled bruschetta" is redundant, but this was that stellar food journal Parade, after all.) Sounded like an excellent appetizer for a day that was predicted to reach 95 degrees in Seattle. It called for ciabatta bread, and I recalled the one minute ciabatta recipe I'd enjoyed before. But it was already 1:30... could it be done?
I threw it together, experimentally using white whole wheat for one third of the flour, and set the bowl outside to rise. By 5:00 I figured I'd better get moving if this was going to end up on the dinner table. It had risen adequately, it seemed, although if I'd been thinking I would have increased the yeast. I certainly did not want to use the oven, so I fired up the grill and baked it at about 425 for 25+ minutes on a hollow cookie sheet.

The tomato salad was a basic combination of fresh tomatoes, red onion, basil, garlic, red wine vinegar, extra-virgin olive oil, salt, and pepper. Pretty standard, but there is simply no bad way to combine those ingredients. Sadly, only the basil was from the garden. Mid-August and I've had two ripe tomatoes. And don't even get me started on the peppers. This has been a stonkingly unproductive gardening year so far.

Verdict: Not bad. The bread was certainly a bit rushed. It didn't really open up like a ciabatta should, and I'm sure flavor would be better if the yeast had more time to do its thing. The whole wheat probably interfered with the usual texture, too. But once grilled and topped, totally satisfactory for the wall time and level of effort.
Thursday, March 18, 2010
simple crusty beer bread
I saw this recipe for a partial whole wheat modification of this no-knead simple crusty bread from the Artisan Bread in Five Minutes a Day book. I thought I'd touch it up a bit with some beer and vinegar, along the lines of the Cook's Illustrated almost no-knead modification.
Here are the goods:
Baked a loaf the next day. Let the dough ball rise for a little under an hour, slashed fairly deeply, then baked on a stone at 450 degrees for 30 minutes, with a steam tray.

Wonderful! The oven spring was proportionally greater than I've ever seen. The small loaf remained dense, at nearly 20 ounces, but with a tender crumb and good crust. We had it for dinner while still warm and it was excellent. I would try 35 minutes next time. Should try slashing in a way that lets it open up even more, too. And I'll bet the fraction of whole wheat could be increased.

The presence of beer was more evident than in any bread I've made, contributing a superb yeasty flavor without any of the cloying sweetness that I think I've detected the times I've used Budweiser. The Cerveza Caguama, a light lager from El Salvador, is something I bought for a party where I suspected Corona drinkers to be present. It looks and tastes about the same, although notably skunkier. It is paradoxically tolerable when intolerably cold, but this bread is a much better use for it.
2010-03-19 update: I baked another loaf today and gave it a central slash and about four more curving ones on each side. It worked even better, and looked like an armadillo! I may have to do something with that theme.
Here are the goods:
- 1.5 tablespoons Morton kosher salt
- 1.5 tablespoons active yeast
- 2.5 cups warm water
- .5 cup beer (Cerveza Caguama)
- 2 tablespoons white distilled vinegar
- 340 grams white whole wheat flour
- 635 grams all purpose flour
Baked a loaf the next day. Let the dough ball rise for a little under an hour, slashed fairly deeply, then baked on a stone at 450 degrees for 30 minutes, with a steam tray.

Wonderful! The oven spring was proportionally greater than I've ever seen. The small loaf remained dense, at nearly 20 ounces, but with a tender crumb and good crust. We had it for dinner while still warm and it was excellent. I would try 35 minutes next time. Should try slashing in a way that lets it open up even more, too. And I'll bet the fraction of whole wheat could be increased.

The presence of beer was more evident than in any bread I've made, contributing a superb yeasty flavor without any of the cloying sweetness that I think I've detected the times I've used Budweiser. The Cerveza Caguama, a light lager from El Salvador, is something I bought for a party where I suspected Corona drinkers to be present. It looks and tastes about the same, although notably skunkier. It is paradoxically tolerable when intolerably cold, but this bread is a much better use for it.
2010-03-19 update: I baked another loaf today and gave it a central slash and about four more curving ones on each side. It worked even better, and looked like an armadillo! I may have to do something with that theme.
Monday, March 15, 2010
one-minute ciabatta bread
How could I possibly pass up a one-minute ciabatta bread hack?
Before leaving for work:
Baked it in the evening for 25 minutes at 425 degrees on a baking stone, sprinkled top and bottom with a Tuscan herb mix. I also used a steam tray. The large greased bowl made pouring this wet dough onto a prepped pizza peel easy, so I achieved a pretty good shape and easily snapped it onto the stone.
Oven spring and crust formation were nice. It ended up nearly semicircular in profile.

It does take more than a minute, but taking all prep and cleanup into account it's probably no more than five, and that's quite excellent for this very palatable result. Really tender but chewy crumb, nice flavor, great with butter.

It probably could have baked for another five minutes. I'll try it with a higher protein flour next time, which I think would make the texture closer to other ciabattas (ciabatti?) I've had. As-is, though, it is quite worthy and would be an admirable sandwich bread.
Before leaving for work:
- 1/4 teaspoon active yeast stirred into
- two cups warm water
- 600 grams (about 4 cups) all-purpose flour
- 1 mounded teaspoon Morton kosher salt
Baked it in the evening for 25 minutes at 425 degrees on a baking stone, sprinkled top and bottom with a Tuscan herb mix. I also used a steam tray. The large greased bowl made pouring this wet dough onto a prepped pizza peel easy, so I achieved a pretty good shape and easily snapped it onto the stone.
Oven spring and crust formation were nice. It ended up nearly semicircular in profile.

It does take more than a minute, but taking all prep and cleanup into account it's probably no more than five, and that's quite excellent for this very palatable result. Really tender but chewy crumb, nice flavor, great with butter.

It probably could have baked for another five minutes. I'll try it with a higher protein flour next time, which I think would make the texture closer to other ciabattas (ciabatti?) I've had. As-is, though, it is quite worthy and would be an admirable sandwich bread.
Sunday, January 31, 2010
getting started with Healthy Bread in Five Minutes a Day
For Christmas Tracey gave me Healthy Bread in Five Minutes a Day. I don't have the authors' first book, Artisan Bread in Five Minutes a Day, but I was familiar with the basic technique: make a large batch of a wet dough, store it in the refrigerator, and use it as needed for the next couple of weeks. A wet dough is the basic alternative to kneading because it gives the flour's gluten strands a way to align on their own rather than through laborious manual intervention. The downside is that wet doughs must be handled pretty carefully and are hard to shape.
I started with the first recipe, for the whole grain artisan free form loaf:
It rapidly doubled or tripled in size, at which point it refrigerated it. The next day I made two small loaves, one plain and one sprinkled with a dry Tuscan herb mix. I need a new and less broken pizza stone so this time I baked on a greased hollow-core cookie sheet.
This is the first time I've tried steam baking. Between two and three cups of ice cubes on a broiler pan provided steam for perhaps 25 minutes, but took a few minutes to get going. It would be better to give the ice a head start before inserting the loaves. I also tried hot tap water for subsequent loaves; I think this is superior as it produces steam almost immediately and is easier to quantify.
This dough spreads out quite a bit after being formed and resting for 90 minutes. I think my technique could have been better, resulting in a tighter loaf. However, oven spring was significant, as promised.

They baked at 460 for 30 minutes, which seemed about right. The crust is nicely crispy. Crumb was tender and not too dense. Flavor was a bit bland and undersalted, to my taste. This dough should develop sourdough characteristics over time, so a comparison in a few days will be interesting.

At five days I made another loaf. The refrigerated dough was weeping a bit, which is not a problem. This one came out pretty flat; I did not do a good job of shaping it or tucking the sides under. After 90 minutes of rising it was very wide and squat. The flavor was somewhat improved, I thought. Definitely needs salt.
The dough was six days old when I used the last of it. This time I floured the dough and my hands better and took more care in shaping the loaf while still doing it in under 20 seconds. More flour is a big help, and I think also helps the dough hold its shape while rising.
This time I baked for 20 minutes on the cookie sheet, then 10 minutes on the rack. The top crusts so far had been great, but with pallid bottoms. This helped a little, but what I really need is a new stone. In the meantime I should try rising on parchment paper and baking in the dutch oven.

The last loaf turned out the best although it was still irregularly shaped and proportioned. Tucking the sides completely and evenly may be the key to avoiding this, for even though the loaf initially looks perfectly symmetrical the manner in which it rises and springs reveals the internal inconsistencies. I'll have to try the letter-fold technique, too. Also, this loaf was a little larger (17 ounces after baking) and perhaps that causes it to collapse a bit under its own weight.

For the second dough I chose the 100% whole wheat with olive oil:
By this time I was getting a little better at shaping the loaves.

Because the loaf is supposed to be formed in only 20 to 40 seconds if there is a major malformation it's probably unwise to try to correct it.


The second loaf was better shaped and also small, at only 11 ounces baked. I baked it on parchment paper in a preheated dutch oven, uncovered. Oven spring was quite good. For a loaf that fits this is far better than a cookie sheet.

The third loaf was considerably larger at over 17 ounces baked and also fairly well shaped. And, my new baking stone had arrived. Oven spring was good, but I think the stone needed more preheating. It's much thicker than my old pizza stone.

For the fourth loaf I tried the garlic-studded baguette recipe. It was my first attempt at the letter-fold method and it did not go very well. For one thing, I should have made a smaller loaf; this one suffered quite a bit of abuse. For another, I tried using a pizza peel and even though it was liberally cornmealed the loaf offered considerable resistance to my dislodgement efforts. The result was unattractively irregular, to say the least. Also, I did not shove the garlic down deeply enough to keep it from popping out.

As for flavor, pretty uninspired. The garlic doesn't really contribute anything to any slice that doesn't have a piece.
So, what is my assessment at this point? The method is definitely low-effort. I can produce a pretty decent basic loaf and it really does require but five minutes of active effort on baking day. On the day it's baked the crust is excellent; after that it loses its crispness. (This may be a sign of slight underbaking, actually.) It has a relatively dense crumb. It keeps well for a couple of days or more. Flavor from these two basic recipes is underwhelming. I didn't think any sourdough flavors ever developed to a meaningful degree. It makes pretty tasty toast.
Will I keep doing this? Yes, I think I will. I'll keep working my way through the book and I'm sure some of the recipes will be more interesting. And at the very least this is a way to have fresh bread on any given day with very little effort and not too much wall time either.
I started with the first recipe, for the whole grain artisan free form loaf:
- 720 grams (5.5 cups) whole wheat flour
- 270 grams (2 cups) unbleached AP flour
- 15 grams (1.5 tablespoons) granulated yeast
- 15 grams (1 tablespoon) Kosher salt (calibrated for Morton's)
- 35 grams (1/4 cup) vital wheat gluten
- 900 grams (4 cups) lukewarm water
It rapidly doubled or tripled in size, at which point it refrigerated it. The next day I made two small loaves, one plain and one sprinkled with a dry Tuscan herb mix. I need a new and less broken pizza stone so this time I baked on a greased hollow-core cookie sheet.
This is the first time I've tried steam baking. Between two and three cups of ice cubes on a broiler pan provided steam for perhaps 25 minutes, but took a few minutes to get going. It would be better to give the ice a head start before inserting the loaves. I also tried hot tap water for subsequent loaves; I think this is superior as it produces steam almost immediately and is easier to quantify.
This dough spreads out quite a bit after being formed and resting for 90 minutes. I think my technique could have been better, resulting in a tighter loaf. However, oven spring was significant, as promised.

They baked at 460 for 30 minutes, which seemed about right. The crust is nicely crispy. Crumb was tender and not too dense. Flavor was a bit bland and undersalted, to my taste. This dough should develop sourdough characteristics over time, so a comparison in a few days will be interesting.

At five days I made another loaf. The refrigerated dough was weeping a bit, which is not a problem. This one came out pretty flat; I did not do a good job of shaping it or tucking the sides under. After 90 minutes of rising it was very wide and squat. The flavor was somewhat improved, I thought. Definitely needs salt.
The dough was six days old when I used the last of it. This time I floured the dough and my hands better and took more care in shaping the loaf while still doing it in under 20 seconds. More flour is a big help, and I think also helps the dough hold its shape while rising.
This time I baked for 20 minutes on the cookie sheet, then 10 minutes on the rack. The top crusts so far had been great, but with pallid bottoms. This helped a little, but what I really need is a new stone. In the meantime I should try rising on parchment paper and baking in the dutch oven.

The last loaf turned out the best although it was still irregularly shaped and proportioned. Tucking the sides completely and evenly may be the key to avoiding this, for even though the loaf initially looks perfectly symmetrical the manner in which it rises and springs reveals the internal inconsistencies. I'll have to try the letter-fold technique, too. Also, this loaf was a little larger (17 ounces after baking) and perhaps that causes it to collapse a bit under its own weight.

For the second dough I chose the 100% whole wheat with olive oil:
- 910 grams whole wheat flour
- 15 grams granulated yeast
- 15 grams kosher salt
- 35 grams vital wheat gluten
- 790 grams lukewarm water
- 110 grams olive oil

By this time I was getting a little better at shaping the loaves.

Because the loaf is supposed to be formed in only 20 to 40 seconds if there is a major malformation it's probably unwise to try to correct it.


The second loaf was better shaped and also small, at only 11 ounces baked. I baked it on parchment paper in a preheated dutch oven, uncovered. Oven spring was quite good. For a loaf that fits this is far better than a cookie sheet.

The third loaf was considerably larger at over 17 ounces baked and also fairly well shaped. And, my new baking stone had arrived. Oven spring was good, but I think the stone needed more preheating. It's much thicker than my old pizza stone.

For the fourth loaf I tried the garlic-studded baguette recipe. It was my first attempt at the letter-fold method and it did not go very well. For one thing, I should have made a smaller loaf; this one suffered quite a bit of abuse. For another, I tried using a pizza peel and even though it was liberally cornmealed the loaf offered considerable resistance to my dislodgement efforts. The result was unattractively irregular, to say the least. Also, I did not shove the garlic down deeply enough to keep it from popping out.

As for flavor, pretty uninspired. The garlic doesn't really contribute anything to any slice that doesn't have a piece.
So, what is my assessment at this point? The method is definitely low-effort. I can produce a pretty decent basic loaf and it really does require but five minutes of active effort on baking day. On the day it's baked the crust is excellent; after that it loses its crispness. (This may be a sign of slight underbaking, actually.) It has a relatively dense crumb. It keeps well for a couple of days or more. Flavor from these two basic recipes is underwhelming. I didn't think any sourdough flavors ever developed to a meaningful degree. It makes pretty tasty toast.
Will I keep doing this? Yes, I think I will. I'll keep working my way through the book and I'm sure some of the recipes will be more interesting. And at the very least this is a way to have fresh bread on any given day with very little effort and not too much wall time either.
Sunday, December 20, 2009
meat grades and quality at various stores
While contemplating my Christmas dinner menu and looking at ad sheets I began wondering about quality differences between the beef sold under various store brands.
There's a thread at Chowhound in which someone states that Safeway as a corporation sells USDA Select, not Choice, and that the Rancher's Reserve label is ungraded but falls between Select and Choice. According to the Safeway site, "With Rancher's Reserve, you can feel confident you're serving the most premium, tender beef available anywhere". Here's an article in BEEF Magazine about the patented tenderness measurement and intervention processes used. It's quite interesting and makes a pretty convincing case for why you can indeed rely on this brand for tenderness. However, I'm not at all sure that the focus group results indicating tenderness to be the most important aspect of beef-eating satisfaction are representative of my views. If that electro-stimulated and mechanically-stretched strip steak is tender but lacks enough intramuscular fat to be juicy and flavorful, I'm not going to be satisfied. The USDA quality grading system may be unreliable with respect to tenderness but I suspect it's better for assuring flavor.
TOP Food & Drug carries the Five Star brand. The TOP web site says "Our USDA Choice Natural beef is tender, flavorful, and mouth-wateringly juicy. It is natural with no additives and skillfully crafted by our meat experts". I can't find anything else about it online. I haven't purchased much beef there.
QFC sells the Certified Angus Beef brand. It does not appear to be USDA graded but here's an explanation of where the brand fits in to the USDA scheme and the additional quality specifications they use. It looks like they use their own Prime label. I very rarely shop at QFC and don't think I've ever purchased it.
Costco carries USDA Choice at a minimum, and some Prime. I've generally been pleased with the Choice grade New York strips and ribeyes. Filet mignon and sirloin have been kind of hit-or-miss for me.
Whatever Fred Meyer sells is generally pretty crummy. I discover this anew every time I stupidly buy a steak there. I see that the "tender, juicy and oh, so savory" rib eye roast they are advertising is USDA Select. Mmm.
Central Market has a real butcher shop in the store. I haven't purchased much meat there. It looks like one of their brands is Country Natural Beef. This is an Oregon cooperative that, from the web site, appears to not suffer from some of the "natural" and "organic" nonsense described in The Omnivore's Dilemma.
I should undertake a more deliberate study of the options. I'm pretty pleased with Costco but shopping there is generally far too inconvenient for me to just run out and pick something up for dinner.
Saturday, December 19, 2009
second rye sourdough bread
I pulled the rye sourdough starter out of the refrigerator yesterday and fed it. Today I tried another rye sourdough recipe, at http://www.recipezaar.com/Crusty-Sourdough-Rye-Bread-170558. It uses yeast as well as sourdough, at least in the less-than-a-day variant.

It starts with a cup of starter, a cup and a half of rye flour, and a cup of water. This can be used immediately or allowed to do its thing and develop some sourness. I let it stand for six hours. It was lively and the volume increased significantly, but it wasn't particularly sour.
A cup of whole wheat flour, a cup and three fourths of all-purpose flour, salt, sugar, caraway seeds, and proofed yeast go in next. I kneaded for nine minutes. This dough was quite manageable; far less sticky and easier to handle than the previous attempt. As instructed, I added flour whenever it felt like it was reaching the point of adherence to something other than itself.

It rose for an hour and a half. I then punched it down, lightly kneaded, let it rise for another half hour.

This is the first time I've used the spray technique. For the first nine minutes at 425 degrees I sprayed every three minutes. It then spent another 25 minutes at 400.

Looked great! It rested for about half an hour while we had dinner. It was still warm, but irresistible. The boys and I sampled it.

Very nice, though not sour at all. In fact, I thought it had a faint sweetness from the whole wheat. Pillowy soft crumb, thin but crispy crust, and good rye and caraway flavors. I think this recipe is a winner. Next time I think I'll give the chef a good 24 hours and see if I can get some sourness.

2009-12-21 update: It's holding up really well. Made great sandwiches yesterday. Very nice with gruyere today.
Tuesday, December 15, 2009
french cooking in ten minutes
Edouard de Pomiane and his 1930 book French Cooking in Ten Minutes OR Adapting to the Rhythm of Modern Life are mentioned by Julian Barnes in The Pedant in the Kitchen. It's discussed at some length, actually, and sounded delightful to me. I have now read the translation by Philip and Mary Hyman and have been trying some recipes. It is indeed a wonderful little book.

Pomiane was an eminent medical doctor and researcher at the Pasteur Institute, not a professional chef. He was very much a food scientist, though, referring to this field as gastrotechnology. He was a renowned cooking lecturer, teacher, and radio host. He wrote twenty-two books on the art. Judging from this brief volume he was as entertaining as he was concise, and as philosophical as he was scientific.
And it's not just a collection of ten minute dishes. He has entire multi-course luncheon and dinner menus that can be prepared in ten minutes or so by a well-organized cook. (Of course he does not include the time it takes to boil water or heat oil, and allows for one dish to be finishing while its predecessor is being consumed.)
Here's how it begins:
Barnes mentions Tomato Soup as a dish that failed for him. It's the first one I tried. This is my paraphrase:
I've also made the Alsatian Dumplings and Whiting Boiled in Court Bouillon. Rather than whiting fish I used striped pangasius fillets. The court bouillon was made with a bay leaf, white vinegar, curry power, ground nutmeg, black pepper, and salt. Topped with lemon butter and bread crumbs the fish was excellent. The boys loved the dumplings, which I finished with just butter, salt, and pepper.
This book is a treasure trove of simple recipes and efficient methods. Great fun.

Pomiane was an eminent medical doctor and researcher at the Pasteur Institute, not a professional chef. He was very much a food scientist, though, referring to this field as gastrotechnology. He was a renowned cooking lecturer, teacher, and radio host. He wrote twenty-two books on the art. Judging from this brief volume he was as entertaining as he was concise, and as philosophical as he was scientific.
And it's not just a collection of ten minute dishes. He has entire multi-course luncheon and dinner menus that can be prepared in ten minutes or so by a well-organized cook. (Of course he does not include the time it takes to boil water or heat oil, and allows for one dish to be finishing while its predecessor is being consumed.)
Here's how it begins:
I dedicate this book to Madame X, asking for ten minutes of her kind attention.Heh.
Barnes mentions Tomato Soup as a dish that failed for him. It's the first one I tried. This is my paraphrase:
bring two cups of water to a boilI also added a sprinkle of tarragon. I didn't have any semolina so I ground couscous made of durum wheat. I suspect it wasn't ground finely enough, as the soup had the distinct texture of very small couscous. However, it was not an objectionable texture, it stayed in suspension, and the flavor was just fine. Just as good as any canned tomato soup I've ever had, really, and it probably cost ten cents!
stir in a heaping tablespoon of tomato paste
stir in two tablespoons of finely ground semolina
salt the soup
boil for six minutes
stir in four tablespoons of heavy cream
I've also made the Alsatian Dumplings and Whiting Boiled in Court Bouillon. Rather than whiting fish I used striped pangasius fillets. The court bouillon was made with a bay leaf, white vinegar, curry power, ground nutmeg, black pepper, and salt. Topped with lemon butter and bread crumbs the fish was excellent. The boys loved the dumplings, which I finished with just butter, salt, and pepper.
This book is a treasure trove of simple recipes and efficient methods. Great fun.
first homemade kvas, part 1
For my first kvas I used the recipe that calls for rye sourdough starter that I found at http://ask.metafilter.com/64513/Kvas-recipe:
I started with 485 grams of fresh bread.


The bread dried to 371g. Broken open it was not really fully dry inside, but close. I failed to break it into small pieces to start with.

I combined the boiling water and bread and five hours later poured, strained, and added the molasses and starter.


The water tastes just like liquid rye bread. With molasses, the flavor is just what you'd expect.

The rye sourdough starter tastes startlingly like a Belgian ale! It's crazy!

I did not do anything to avoid aeration and didn't take any sanitization steps up to this point.
The next day I bottled, ending up with three full Martinelli's bottles (25 ounces, I think), plus maybe eight ounces of dregs. I cleaned and sanitized the bottles, funnel, and filter, but did not use any gear to prevent aeration during pouring.
It had certainly fermented and was quite lively on the tongue. The molasses is the predominant flavor and it's rather sweet. I would try making this with a different adjunct, and unless it becomes dryer in the bottle I would use less.
About an inch of sediment settled in the bottles. Two days later, I opened one. Ooooooh. Aaaaaah. All but about three ounces blasted forth like foam from a fire hose. It was quite magnificent in a dancing about the sink trying to keep the walls and ceiling dry sort of way. Needless to say, what remained was murky. It wasn't all that different in flavor or carbonation from when it went into the bottle. The boys didn't really like it. I thought it was OK for sipping but it's not what I'd call a refreshing beverage.
About a week ago I bought a two liter bottle of homemade kvas at European Foods. The proprietor told me to exercise caution when opening it. It was quite explosive, all right. Even the third and fourth openings caused it to release mighty blasts of CO2 and completely stir up the sediment. Hmm.
Well, crud. I'm going to leave the other two bottles alone for a while and think about how to better extract their contents. Mayhap extreme cold would help. At the very least I'll have to capture it and if it's not drinkable use it as a soup base or something.
Here is a simple recipe for kvas in every way except time (preparation takes at least 5 days, though you don't have to be paying attention the whole time) but I imagine it will be very good. My wife just got a great cookbook called "Bread Matters" and I noticed the kvas recipe in it just a few days ago.
The (five) days before, prepare a rye production sourdough (recipe below).
450 grams rye bread
4 1/2 litres water
300 grams molasses
150 grams rye production sourdough
2 raisins per bottle
Cut the bread into small pieces and dry them out thoroughly, either in a warm place or in a low oven. Put them in a bucket of at least 5 litres capacity. Boil the water and pour in over the bread. Cover and leave until the temperature has dropped to about 35 degrees. Pour the mixture through a fine sieve into another bucket. Press the crumbly sludge very gently to release the last of the liquid, but do not squeeze it hard or too much sediment will fall in. Add the molasses to the warm liquid and mix thoroughly. Then mix in the rye sourdough and leave it in a warm place for twelve hours. In the morning, strain and pour into sterilized bottles, adding the two raisins per bottle. Seal the bottles and leave them in a cool place.
If after two days, the bottles have not carbonated, give them a shake and move them to a warm place to carbonate. Drink chilled, or use as the liquid for making soup such as borshch.
In order to make rye production sourdough, you first have to make rye sourdough starter.
To make a rye sourdough starter, start by mixing together 25 grams of rye flour and 50 grams of warm water; keep these in a warm place. The next day, add another 25 grams of rye flour and 50 grams of warm water. Again on day three, and again on day four; same proportions. Leave the mixture for one more day; now you have your rye sourdough starter.
Now, take 50 grams of the starter. Add 150 grams rye flour and 300 grams water. Mix together to form a sloppy mixture and leave for 12-24 hours. Now you have your rye production sourdough.
I started with 485 grams of fresh bread.


The bread dried to 371g. Broken open it was not really fully dry inside, but close. I failed to break it into small pieces to start with.

I combined the boiling water and bread and five hours later poured, strained, and added the molasses and starter.


The water tastes just like liquid rye bread. With molasses, the flavor is just what you'd expect.

The rye sourdough starter tastes startlingly like a Belgian ale! It's crazy!

I did not do anything to avoid aeration and didn't take any sanitization steps up to this point.
The next day I bottled, ending up with three full Martinelli's bottles (25 ounces, I think), plus maybe eight ounces of dregs. I cleaned and sanitized the bottles, funnel, and filter, but did not use any gear to prevent aeration during pouring.
It had certainly fermented and was quite lively on the tongue. The molasses is the predominant flavor and it's rather sweet. I would try making this with a different adjunct, and unless it becomes dryer in the bottle I would use less.
About an inch of sediment settled in the bottles. Two days later, I opened one. Ooooooh. Aaaaaah. All but about three ounces blasted forth like foam from a fire hose. It was quite magnificent in a dancing about the sink trying to keep the walls and ceiling dry sort of way. Needless to say, what remained was murky. It wasn't all that different in flavor or carbonation from when it went into the bottle. The boys didn't really like it. I thought it was OK for sipping but it's not what I'd call a refreshing beverage.
About a week ago I bought a two liter bottle of homemade kvas at European Foods. The proprietor told me to exercise caution when opening it. It was quite explosive, all right. Even the third and fourth openings caused it to release mighty blasts of CO2 and completely stir up the sediment. Hmm.
Well, crud. I'm going to leave the other two bottles alone for a while and think about how to better extract their contents. Mayhap extreme cold would help. At the very least I'll have to capture it and if it's not drinkable use it as a soup base or something.
Subscribe to:
Posts (Atom)